Breakfast Nook Dresser: Two Toned Transformation- How To

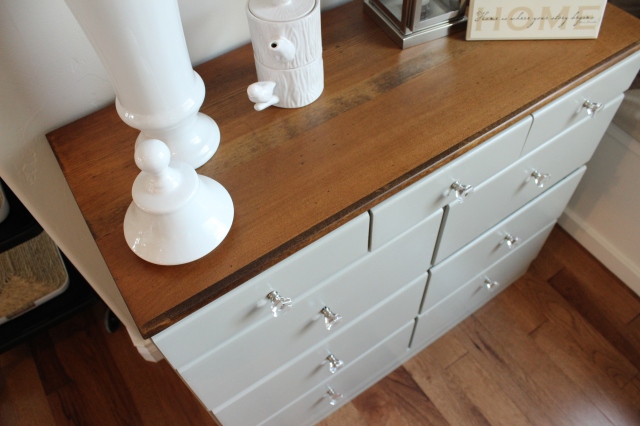
Last week I showed you our newly transformed dresser. And because I am so happy with the way that it turned out, today I’m showing you what I did.

First off, I headed to Walmart to buy some paint stripper. I followed the directions on the container and ended up doing it 2 times to remove most of the paint. Very easy, but just make sure you apply a nice thick & even coat!

After I scrapped off all the paint, I got busy sanding! With our large sander, going with the grain, I sanded down the entire top until the black paint & gray primer was completely removed. Be patient.

Because I was staining the top, I sanded down the front and sides as well. I also made sure the surface was super smooth.

After the sanding was finished, I wiped down the top & sides with a microfiber towel, followed by a cheesecloth. Leave no dust behind!

Next, I picked out my stain. I originally planned on using Minwax Early American, but I tested a small spot on the side of the dresser and it was REALLY dark!

(I freaked, which I shouldn’t have, because I could have just sanded it off….)

After that I played around with several different colors, some together & some not, and ended up with Provincial by Minwax.

I found that the sides of this wood (pine) stained darker than the top. I barely wiped the stain on the sides before I wiped it off again and it was DARK. It threw me for a loop. So, I tried about 4 colors on the side, but I didn’t like any of them. They were too light. The dark color looked the best, so I decided to do it on the top.

Thinking it would do the same as the sides, I wiped it on and off again quickly. It hardly touched it. So the next time I let it sit a tad longer…. still not as dark as I was going for.

I could see that I wasn’t going to get the color I wanted with the Early American stain, so I grabbed the darkest stain in our cupboard, Provincial by Minwax. Boy did this scare me… it was dark…

I spread the entire top with the stain, wiped it off, and it gave me a slightly darker color… rather than doing the same, wipe on, wipe off for the next hour, I decided it was time to just go for it. I put a thick coat of stain on the top and waited.

After about 10 minutes I wiped off the stain and could tell it was getting darker. I did it again and waited another 10 minutes. This time I wiped it off and it was perfect! Finally!

I called it a night and waited until the next day to spray on a sanding sealer. Once that was dry, I LIGHTLY sanded the top with 220 grit sandpaper, going with the grain, and wiped it down with cheesecloth. Then, I sprayed on two coats of a satin poly. I didn’t want a super thick or shiny coat, so satin was the way to go.

Once the top was dry, I taped off the edges with Scotch Blue Delicate Tape and started painting. For the color, I chose Martha Stewart’s Mourning Dove. I had it mixed in a water based enamel with a semi gloss sheen. Not too shiny, not too dull. Just right. 😉

When it was dry, I reinstalled my knobs and waited a day or so before moving it back inside the house.

3

Honestly, nothing about this project was hard. A little time consuming, yes. But not hard.

It was totally worth the work and we love the outcome! Plus, it has totally changed my feelings towards our current table. Without planning it, the stain on the dresser matches the table. For now, the table stays.

Here’s my advice to you: if you have a piece of furniture that you really want to transform but are frozen with fear, quit it! Trust your instincts! Don’t let fear stop you. And certainly don’t be afraid of paint or stain. They don’t bite!

Now get out there and transform- you won’t be sorry!

Big Smiles!

Linking up to:

Thrifty Decor Chick

Breakfast Nook Update: Refinished Dresser

Hello and Happy Friday!

I’m back with yet another breakfast nook update. Now that we have added the bench, it’s prodded me to finish several other projects that I’ve been wanting to accomplish.

When I originally told you about the breakfast nook changes, I showed you my to do list:

1. Make a bench out of existing cabinets the full length of the window. Hopefully I can find the cabinets at Habitat for Humanity to save on cost. Fingers crossed!

2. DIY a bench cushion.

3. Hem curtains to allow for bench.

4. Get new pedestal table. I’ve been searching Craigslist and think I might have found one on the cheap. Just a little paint and elbow grease and we’ll have a show stopper.

5. Find new chairs for the table.

6. Find & install a new light fixture.

7. Make new DIY artwork.

8. Find new rug.

9. Accessories, Accessories, Accessories!

However, what I didn’t include on the list was refinishing the dresser.

Much like the table, it’s an important piece to the room. And one thing I never liked about the dresser was that it clashed with our current table and chairs.

Now, for a little history on the dresser. This was the first piece of furniture that I bought on the cheap with the intention of refinishing. Spray paint had also rocked my world around the same time, so, naturally we spray painted the entire thing black and changed out the knobs. Needless to say, this was a HUGE improvement to its previous condition. I really liked the look of the black.

Then, we moved in to our house and it’s new found home was in the breakfast nook posing as a sideboard rather than a dresser.

For six months I have looked at the breakfast nook knowing that there were several things “missing” or “out of place” and for six months I had been looking for the solution. Little did I know at the time, but the black dresser was prohibiting my true inspiration and ideas for the space. Sounds deep, I know.

After we installed the bench, I knew my next step was to transform the dresser. I kept imagining a totally different look and vibe. Something softer, more natural, with furniture that didn’t instantly “grab” or “take over” the room. The dresser kept doing that.

Now, for the record, I have nothing against black furniture. Obviously I think it’s striking, or I wouldn’t have painted it that way in the first place. Problem was, I kept trying to make it “fit” and it wouldn’t. It needed painted. And I was finally ok with doing it.

Inspiration hit not long after, and I had my solution.

This dresser underwent my first “serious” renovation. It didn’t include spray paint, and it didn’t include one solid color. Two toned was the way to go!

I wish I could show you the full room so that you could see the impact it’s had on the space, but you’ll have to wait!

Here it is all by it’s lonesome!

I am completely smitten with it’s two toned finish and the way the stain compliments the paint. It’s pure loveliness with a touch of rustic!

I’m totally impressed with how much better my accessories look! They’re no longer competing for your attention…

I left all of the original nicks and nail holes. They give it the slight rustic look that I was wanting. It’s not perfect and it looks like it has it’s own story.

This was such a rewarding project and one that taught me so much. I found that staining wood isn’t something to be afraid of. It won’t bite and it’s fixable- just grab your sander!

The more that I work with furniture, the more that I like it. Seeing these transformations is enough to keep me going!

Stay tuned for the step by step guide on how I transformed this dresser.

Big Smiles!

I’m linking up to:

Miss Mustard Seed

A Bowl Full Of Lemons

House of Hepworths

The 36th Avenue

Alderberry Hill

DIY Show Off

October Month in Review

Happy November 1st! Was it just me, or did October fly by?

I’m doing something new today. I’m wrapping up October… in one post. Welcome to our first Month in Review.

I kicked off October by Decorating the front porch with corn stalks:

Then I revealed my Painted Secretary:

The Secretary Reveal launched us into a ton of Entryway Updates:

With that, I showed you several new tutorials. Like the DIY Skeleton Key Art:

And the DIY Stick & Twig Star:

After the star I showed you my Upholstered Thrift Store Chair:

And then moved into the kitchen with my White Kitchen Tray:

Then it was onto more fall decorating- Happy Fall: Stick Style:

With that, I started a new series and showed you my Fall Welcome Banner:

Next, it was all about the office with my Office Desk Organizer Makeover: (say that three times fast!)

And then off to the Free Mudroom Bench:

Followed by the Living Room Curtains:

After that I told you all about our Breakfast Nook Plans:

Source

After sharing my plans & inspiration, it was back to the mudroom with our updated Burlap Frame:

And finally, I wrapped up the month revealing my Painted Sewing Machine Table:

Whew! What a month! That was a lot! I feel so accomplished. 😉

What was your favorite project? Do tell!

Tomorrow I’ll be back with more!

Big Smiles!

Painted Sewing Machine Table

Ever since I was a little girl I wanted to know how to sew. I was in a 4-H sewing group until middle school, but by then I was too caught up in sports and raising pigs and steers for the 4-H market, that sewing took a seat on the back burner.

Honestly, I’ve always felt as if I am a little out of place for my generation. I think that I would have fit better in the 1950’s or 1970’s. Seriously. Being a housewife has always been a dream of mine. No place has even been better than being at home.

Sewing fits right into that. I haven’t ever been one to sew my own clothes, but curtains, tea towels and pillows are right up my alley.

After my husband and I got married, my grandma called and said she had picked me up a really awesome sewing machine with its own stand. I was a little apprehensive that the sewing machine wouldn’t work, but after a good servicing the thing works awesome and even managed to help me make my first big project: curtains for our breakfast nook.

The stand that it came with had definitely been used. It was sad. Stains everywhere. Scratches on the surface. But someone had really loved this machine and the table. You could see it. Heck, you could even feel it. It deserved to be loved again. I was just the person for it.

With the help of a little bit of paint and elbow grease, I brought this lovely lady back to life.

After debating for what seemed like forever on a color, I decided on Heather Gray from Benjamin Moore. It’s exactly right.

I kept the original metal decal and painted it white for a refreshing balance against the gray.

It’s such a happy pop of color against the gray.

Since the sewing machine is old, I wanted the table to have a vintage-y feel to it as well. I think they balance each other nicely.

I’m still on the hunt for a chair to go with it, but until then, it’s fine with taking all the attention. 😉

Here’s to a table and sewing machine that have many good years to come.

Big Smiles!

Linking up to:

Home Stories A to Z

DIY Showoff

The 36th Avenue

Mudroom Bench

It’s been a while since I last talked about my desire to update our mudroom. It’s always seemed a little, well, blah. Honestly, with all of the other rooms calling for my attention, the mudroom has been one of my last concerns. But, boy, I’m ready to get a few wanted projects under my belt.

A mudroom bench was my biggest priority. Especially since we use the mudroom the most. It is, after all, connected to our garage and our main entrance into the house.

We needed a place to sit down and put on our shoes. We needed somewhere to set down a bag. Or a drop zone for the mail (temporarily).

I had been searching for a reasonably priced bench. I almost pulled the trigger on one once or twice. Something kept holding me back. Maybe it was the price or maybe it was because I’d rather spend that money on something else… who knows. I could also have a sixth sense and know that a free bench was coming my way.

Any one of those options works for me.

One day I stumbled upon this:

It was in rough shape. And dirty. Eww. But I could see the potential.

First, I gave it a few coats of white spray paint.

Then I started on the seat upholstery and followed the same steps as I did with my upholstered thrift store chair.

From there I attached the seat to the bench frame with a couple of screws and I was done!

Best part? It was FREE! No kidding. I spent money a while back on the fabric, but I’ve had it for about a year. With that sort of time frame I’m definitely going to call it free.

I’m happy to check that off the to do list.  Here’s what’s left:

1. Add storage bench below coat rack/ frame.

2. Upholster bench cushion or recover existing with fun fabric.

3. Add wire baskets for hats & things.

4. Add art/ pictures to coat rack frame.

5. Accessories, Accessories, Accessories!

6. Paint mudroom/ garage door.

7. Install non slip backing under current rug.

I just love checking things off of a list. It’s so empowering!

Big Smiles!

Upholstered Thrift Store Chair

You’ve already seen the “After” version of my lovely thrift store chair, but I can’t even begin to tell you how much I have fallen in love with it. What started out as a sad little chair ended up being one of my favorite things. Ever. 😉

Here’s it’s Cinderella story:

A while back I was browsing my local thrift store and I walked right into this:

It was really sad looking and practically begging for a makeover.

But the amount of potential was amazing. The shape. The legs. It had it going on!

Well, except for the color, bad paint job, horrible seat fabric and not to mention the fact that it was very wobbly. Nothing  a little TLC couldn’t fix, right? Because of it’s rough condition I was able to make a deal on it big time! $4.00… boo-ya!

In the car it went and I made my way home. My husband took one look at it, looked at me, then back to the chair and shook his head. He thinks I’m crazy, but he went ahead and sat in it… and wobble it did. Obviously it was going to need a little work.

With this being my first upholstery job, I was a bit hesitant about how I was going to reupholster the seat. But I found the best way to gain confidence was to start taking apart the current upholstery job.

By seeing how the original upholstery was done, I knew that I could replicate it on my own. Very easy!

Once I was down to the bare seat, I got busy working on the frame of the chair.

Because the chair had been repainted, and not very well at that, I gave the entire thing a heavy sanding and followed it with a hot soapy bath.

After that came a coat of primer.

My husband dropped in at this point and tightened all the loose screws and brackets and added a piece of wood to the bottom of the chair, between the two legs, for added support. Wobble be gone!

I gave the entire chair a couple coats of light gray spray paint and let it dry overnight.

The next day I was ready to tackle the upholstery.

I started with the foam for the seat.

For the seat, I simply took a piece of foam and traced the seat with a sharpie. Then I cut it out and used hot glue to attach it on the edges and corners.

I was hesitant using hot glue to attach the foam to the seat, but I figured that since I was going to be wrapping it with batting and fabric it would stay in place since the fabric would be wrapped tightly. Hopefully I’m right. 🙂

After the foam was glued to the seat, I started wrapping it with batting.

Using a staple gun, I pulled the batting tight and stapled it to the back of the seat.

After that was finished, I started with my fabric and used the same technique as the batting. I started wrapping the seat with fabric, pulling tight and stapling it to the back of the seat. It was much easier than I thought.

Before I knew it  the entire seat was covered.

And I was admiring the corners.

To attach it to the frame we used a few screws and placed them in the existing screw holes.

Just like that we had a finished chair!

These DIY projects are certainly becoming a favorite in our home! But why wouldn’t they when they turn out like this?

Big Smiles!

Secretary Reveal

It’s a happy day around here! Our secretary is finally finished and we love it!

I’m still amazed at the power of paint and how quickly it can transform! Seriously.

Here was the before:

And the after:

I’m in love with this piece of furniture! It was practically meant for this corner and now it owns it! We couldn’t be happier with the way that it turned out.

Because I wanted the smoothest finish possible, we sprayed painted the entire thing except for the back at the top. I hand painted that with Chelsea Gray. Looove it!

Everything pops against the dark color, which was exactly what I was going for.

After finally talking my husband into painting his family heirloom, I think we can both agree that the finished outcome is lovely.  It went from a piece of furniture that received little to no use or attention, to a desk that is already getting used and admired! What could be better than that?

Here’s a side by side for comparison:

Yowza! Me likey the After! 🙂

Stay tuned tomorrow to see the rest of the entryway and a whole bunch of changes!

Big smiles!

I’m sharing this on: DIY Show Off, Alderberry Hill, House of Hepworths, The Shabby Creek Cottage, A Bowl Full Of Lemons, Thrifty Decor Chick